

Time management
The technique consists of the following steps:
- Select the task to be performed. Estimate how many Pomodoro sessions it will take you to complete it.
- Set a timer/alarm clock for 25 minutes. During this time, work on the task and try not to get distracted by other things.
- When the alarm rings, wind it down for another 5 minutes, during which time take a break and rest.
- When you have finished your break, go back to step 2.
- After four rounds of work, schedule another break not for 5, but for 15-30 minutes.
One of them is the Pomofocus app available at: https://pomofocus.io/. It can be run both on a computer and in a browser on a mobile phone.
First steps in Pomofocus
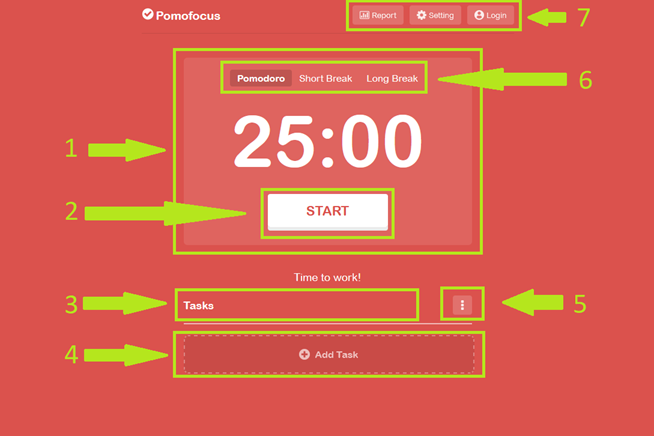
Image 1. The home page with a view of the Pomodoro application. Numbers describe the following individual elements of the application: 1 - clock view, 2 - Start button to start the countdown, 3 - List of added tasks, 4 - button used to add tasks, 5 - button with settings for adding tasks, 6 - changing the clock mode to Work (Pomodoro), Short break and Long break, and 7 - access to reports and changing application settings.
The home page of the application contains virtually all the elements you need to get started.
- A view of the timer.
- The Start button that begins the countdown.
- The place where the tasks you are currently working on are shown.
- A button for adding new tasks you want to work on.
- Settings for adding tasks.
- Changing the timer to the Pomodoro mode, i.e. work, a short break and a long break.
- Buttons to change the settings of the application and to view reports of your work and log in if you have the paid version.
Adding tasks to be performed
To add a new task, click on the Add Task button [marked as 4 in Image 1]. A box will appear for us to add and edit the task.
In the What are you working on? field [1 in Image 2], enter the name of the task you are working on. In the Est Pomodoros field [2 in Image 2], enter the estimated number of sessions you will spend on the task. You can enter the relevant number manually using the keyboard or change the amount using the up and down arrow buttons. By clicking on Add Note [3 in Image 2], you can also add a note. Once all the information has been added, approve the task by pressing the Save button [4 in Image 2].
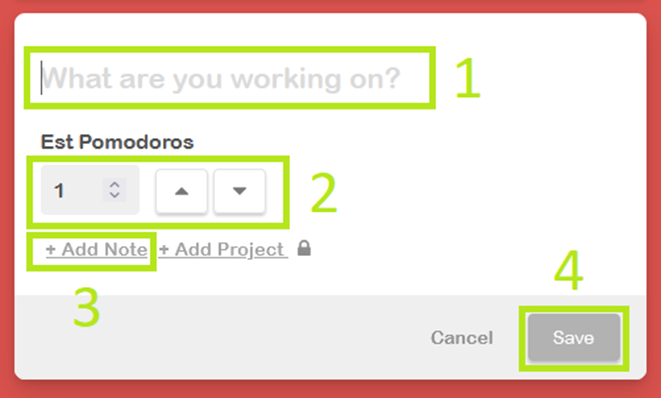
Image 2. A view of the field for editing and adding a new task. Number 1 indicates the field for adding a title, 2 - estimating the number of Pomodoro sessions needed for the task, 3 - adding notes, and 4 - saving and creating the task.
Application operation
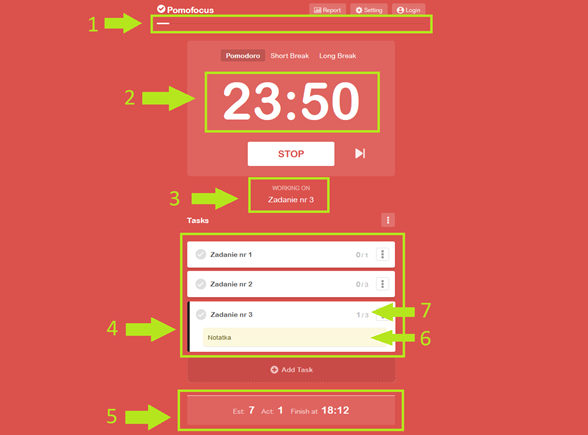
Image 3. A view of the application’s home page during the execution of a specific task. Number 1 is a progress bar showing the ratio of the passed to the remaining time of a given session, 2 – the clock counting down the remaining time, 3 – the name of the task you are currently working on, 4 – the list of tasks with the task currently executed highlighted, 5 – the estimated number of Pomodoro sessions for all your tasks, the number of completed sessions and the estimated time of completion of all tasks, 6 – a view of notes added to the task, and 7 – the number of completed Pomodoro sessions from all planned ones.
- A progress bar showing the ratio of time passed to time remaining from the session.
- A clock counting down the time remaining in the Pomodoro session.
- The name of the task currently being worked on.
- The list of created tasks with the currently performed task highlighted in black.
- The estimated number of Pomodoro sessions for all of your tasks, the number of sessions completed and the estimated end time for all tasks.
- A view of notes added to a specific task.
- The number of completed Pomodoro sessions against all your planned sessions for a particular task.
Personalising the timer settings
To enter the timer settings, press the Setting button with the small cogwheel symbol. The button is located at the top right of the screen [Image 4].

Image 4. A view of the upper part of the screen with the Setting button highlighted.
- The setting field to adjust the lengths of individual work sessions, the short break and the long break. The default values can be freely modified.
- Buttons allowing the user to activate the auto-switching between operating mode and breaks. Without this function activated, you have to activate the countdown of each new session yourself using the Start button on the timer.
- The setting of the number of sessions after which a long break is to be activated.
- Adjusting the alarm sound. It is possible to select the tone from several options, set its volume and the number of times the alarm is repeated.
- Start or stop the clock ticking sound, which can be run in the background. It is possible to select the speed of the ticking and the volume of the sound.
- The OK button for confirming the changed settings.
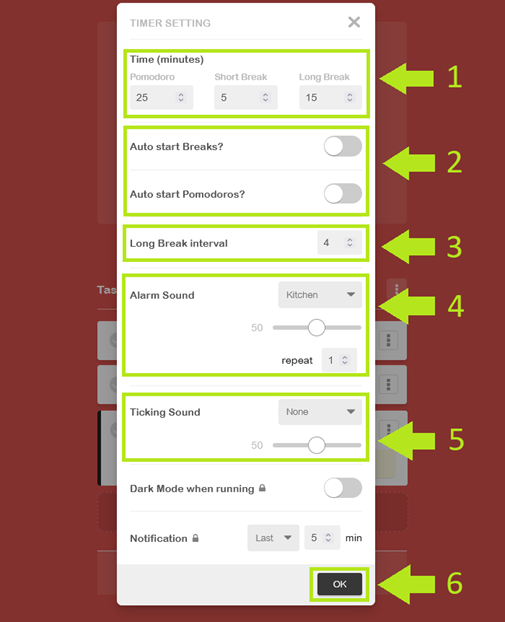
Image 5. A view of the screen with changed settings. The successive arrows indicate: 1 - changing the length of individual sessions, 2 - enabling or disabling the automatic activation of the pause and work mode, 3 - setting after how many work sessions the long pause is to be activated, 4 - changing the alarm signal, its volume and the number of repetitions, 5 - activating the ticking sound of the clock and its volume, and 6 - the OK button for saving the settings.